Friday, November 30, 2007

Dispatcher versus SynchronizationContext

Today I had the pleasure of playing with the Dispatcher and SynchronizationContext classes. I found that the Dispatcher class is useful when your sure that you are calling within the context of the user interface thread and the SynchronizationContext is useful when you're not quite sure.

If you obtain your Dispatcher class using the static Dispatcher.CurrentDispatcher method on some non-UI thread and call the BeginInvoke method, nothing will happen (No exception, no warning, nada). However, if you obtain your SynchronizationContext class via the static SynchronizationContext.Current method, it will return null if the thread is not a UI thread. This feedback is extremely useful since it allows you to react to both a UI thread and a non-UI thread accordingly.

Here is an example using the Dispatcher class:


using System;
using System.Threading;
using System.Windows.Threading; // WindowsBase.dll

namespace Test
{
public delegate void WriteTextDelegate(string message);

public class DispatcherTest
{
public void Start()
{
// Calling thread determines Dispatcher
m_Dispatcher = Dispatcher.CurrentDispatcher;

if (m_Timer == null)
m_Timer = new Timer(new TimerCallback(WriteText),
null, 1000, 2000);
else m_Timer.Change(1000, 2000);
}

public void Stop()
{
if (m_Timer != null)
m_Timer.Change(Timeout.Infinite, Timeout.Infinite);
}

public event WriteTextDelegate Message;

private Timer m_Timer;
private System.Windows.Threading.Dispatcher m_Dispatcher;

private void WriteText(object state)
{
m_Dispatcher.BeginInvoke(
System.Windows.Threading.DispatcherPriority.Normal,
new WriteTextDelegate(OnMessage),
DateTime.Now.ToString());
}

private void OnMessage(string message)
{
if (Message != null)
Message(message);
}
}
}


Here is an example using the SynchronizationContext class:

using System;
using System.Threading;

namespace Test
{
public delegate void WriteSomeTextDelegate(string message);

public class SyncTest
{
public void Start()
{
// Calling thread determines SynchronizationContext
m_Context = SynchronizationContext.Current;

if (m_Timer == null)
m_Timer = new Timer(new TimerCallback(WriteText),
null, 1000, 2000);
else m_Timer.Change(1000, 2000);
}

public void Stop()
{
if (m_Timer != null)
m_Timer.Change(Timeout.Infinite, Timeout.Infinite);
}

public event WriteSomeTextDelegate Message;

private System.Threading.Timer m_Timer;
private System.Threading.SynchronizationContext m_Context;

private void WriteText(object state)
{
string message = DateTime.Now.ToString();

if (m_Context != null)
{
m_Context.Post(new SendOrPostCallback(PostCallback), message);
}
else OnMessage(message); // non-UI thread called Start
}

private void OnMessage(string message)
{
if (Message != null)
Message(message);
}

private void PostCallback(object state)
{
if (state is string)
{
OnMessage(state as string);
}
else throw new ArgumentException("State should be a string");

}
}
}


Notes:
  • I used Reflector to look inside the WindowsBase.dll; however, I had problems finding the dll. I expected to find it in a directory below the usual location (C:\ Windows\ Microsoft.NET\ Framework\ v3.0); however, it was in this directory: C:\ Program Files\ Reference Assemblies\ Microsoft\ Framework\ v3.0
  • WCF: Asynchronous Operations
Friday, November 9, 2007

WCF Security Exception: Timestamp is invalid because its creation time is in the future

Well, I ran into a real fun bug today that surfaced itself on the user's computer as a "Security Exception see Inner Exception". Upon examining the inner exception, it told me that the message was incorrectly secured. After placing some tracing on the server, I found this error message:

The security timestamp is invalid because its creation time ('11/9/2007 10:37:07 PM') is in the future. Current time is '11/9/2007 10:28:52 PM' and allowed clock skew is '00:05:00'.

After fixing the user's clock, which was roughly 8 minutes fast, everything worked great. The next question is "How do I increase the maximum skew time"? It took a bit of searching to figure out that I need to create a custom binding to change the values. Here is an example of how to do it:

<bindings>
<customBinding>
<binding name="MaxClockSkewBinding">
<textMessageEncoding />
<security authenticationMode="Kerberos">
<localClientSettings maxClockSkew="00:07:00" />
<localServiceSettings maxClockSkew="00:07:00" />

<secureConversationBootstrap />
</security>
<httpTransport />
</binding>
</customBinding>
</bindings>

For more information, see How To: Set a Max Clock Skew on MSDN.


More References:

Saturday, August 25, 2007

Problems adding a Vista machine to a domain

A few months ago, I had trouble adding a Windows Longhorn machine to our domain. Yesterday, I experienced the problem again while trying to add my new laptop, which is running Windows Vista Ultimate, to our domain. Personally, I think there is something wrong with our domain controller, but I can't prove it. Plus, searching the web has revealed that only a select few of us unlucky individuals are experiencing this problem. At any rate, I fixed the problem as follows:

Update: I recently sat down with a fellow co-worker and he managed to add his Vista machine to our domain using Step 3 & 4 only.

Step 1:
On the Local Security Policy form change the Network Security: LAN Manager authentication level to the proper setting for your domain.

I could not login to another computer on our domain much less add my computer to the domain until I adjusted my Network Security: LAN Manager authentication level to Send LM and NTLM - use NTLMv2 session security if negotiated; however, you might want to login to a share on an existing computer in your domain to see if you need to do this. Even better, check the Network Security: LAN Manager authentication level on an existing XP machine registered in your domain to get the correct setting.

How to get to
Local Security Policy form:
Start->Control Panel->System and Maintenance->Administrative Tools->Local Security Policy

On the Local Security Policy form, click on the Security Options tree node:
Security Settings->Local Policies->Security Options

In the policy column, look for Network Security: LAN Manager authentication level
and change the Security Setting column to
the proper setting for your domain.


At this point, you should be able to login to a share on a computer in your domain. If not, reboot and try it again.


Step 2:
Give administrators the right to add a computer to a domain.

On the Local Security Policy form, click on the User Rights Assignments tree node:
Security Settings->Local Security Policy->User Rights Assignments

In the policy column, look for Add workstations to a domain and change the Security Setting column to Administrator


Step 3:
Change the computer name to the desired name.


How to get to the Computer Name/Domain changes dialog:
Start->
Control Panel->System and Maintenance->System
In the Computer name, domain and workgroup settings, left click "Change settings"


Step 4:
Use Netdom.exe to add the computer to the domain.

netdom join ComputerName /domain:DomainName /userd:UserName /passwordd:UserPassword

Notes:
  • Yes, there is a letter "d" after user and password in the netdom command.
  • I could not find the netdom.exe application on Vista. I cheated and installed it on an XP machine and copied the netdom.exe to my Vista laptop. On your XP installation disk, you must run the setup.exe under Support/Tools. Afterwards, you will find it under c:\program files\Support Tools\Netdom.exe


References:

Friday, July 13, 2007

How do I upload & download files using WCF?

I'm looking for the best way to accomplish these tasks. What follows is the best information that I've found. I will periodically update this post as I discover more information.

Examples:

WCF gotchas:
  • Don't forget to set the maxReceivedMessageSize attribute of your binding to something fairly high if you are sending large files.

IIS gotchas:
  • Increase the maxRequestLength, which represents maximum length in kilobytes, in the System.Web section of my web.config file in order to upload large files to your server (i.e., < maxrequestlength="65536"> ). Remember that the reason maxRequestLength in the System.Web section was set so low was to decrease your vulnerability to denial-of-service attacks.


Articles worth reading:

Thursday, July 12, 2007

How to generate an XSD file from an existing class

Since one of my co-workers ask me how to generate an XSD file from an existing class today, I decided to post an example of how to do it.

First, I need a class to convert, so I will generate an XSD file from this class, which resides inside of an assembly called MyClassLibrary.dll:

using System.Xml.Serialization;

namespace MyNameSpace
{
[XmlRoot("Customer", Namespace ="http://www.yates.com/BusinessObjects/2007/07")]
public class Customer
{
private string _firstName;
private string _middleName;
private string _lastName;

public string LastName
{
get { return _lastName; }
set { _lastName = value; }
}

public string FirstName
{
get { return _firstName; }
set { _firstName = value; }
}

public string MiddleName
{
get { return _middleName; }
set { _middleName = value; }
}

[XmlIgnore]
public string Name
{
get
{
if (string.IsNullOrEmpty(MiddleName) == false)
return string.Format("{0} {1} {2}", FirstName, MiddleName, LastName);
else return string.Format("{0} {1}", FirstName, LastName);
}
}
}
}
Next, a command prompt window is opened in the same directory as MyClassLibrary.dll.

Afterwards, the following command is used to generate the XSD:
"C:\Program Files\Microsoft Visual Studio 8\SDK\v2.0\Bin\xsd.exe" MyClassLibrary.dll /t:Customer


Finally, an XSD file called schema0.xsd is generated in the same directory as the assembly. It looks like this:

Monday, July 2, 2007

Unable to add a WCF service template to a converted project

I filed a bug at Microsoft's feedback web site on Friday because I was unable to add a WCF service template to a converted project in Visual Orcas March 2007 CTP.

It turns out that it wasn't really a bug. I was ignorant of the fact that you need to change the target framework from whatever it was originally set to (in my case ".NET Framework 2.0") to ".NET Framework 3.0" or ".NET Framework 3.5".

Thursday, June 28, 2007

Application configuration is incorrect - Redistributable Package issue

Well, I managed to break the build indirectly today. The build compiled fine, but when we ran any of our C++ applications, we got this error dialog:


Error message:
This application has failed to start because the application configuration is incorrect. Reinstalling the application may fix this problem.

The problem:
I broke the build by applying Visual Studio service pack 1 to the build machine. As you can see above, the error message we received was clear as mud. With a little bit of hunting, I discovered that changes were made to the C++ redistributable, which show up in the manifest file. As you can see here, the version number in the application intermediate manifest file is 8.0.50727.762 (it was 8.0.50608.0 prior to applying the service pack):


The fix:
Applying the new redistributable to the target machine fixed our problem. You can download the Microsoft Visual C++ 2005 SP1 Redistributable Package (x86) Version 8.0.50727.762 here.


Reference:

Tuesday, June 26, 2007

Changing SQL Server 2005 authentication mode

I had to hunt around today to figure out how to change SQL Server 2005 authentication mode , so I figured I would document it here in case it slips my mind again.

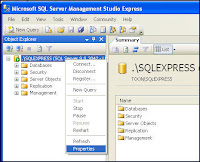
1. Launch SQL Server Management Studio Express ( Start > Programs > Microsoft SQL Server 2005 > SQL Server Management Studio)

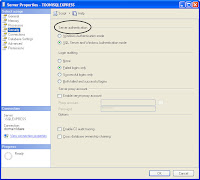
2. Right-click the Server name, select Properties > Security (see picture below)


3. Under Server Authentication, select SQL Server and Windows Authentication Mode


4. Stopped and re-started the SQL Server

Friday, June 8, 2007

Installing Cygwin with the OpenSSL package

Installing Cygwin with the OpenSSL package is fairly easy once you understand how to do it. The folks at Cygwin did a good job of building a custom installer; however, I blew right passed the option for installing the openssl package because it is not Microsoft looking. Here are the instructions for installing Cygwin with the OpenSSL package so that you don't make the same mistake that I did:

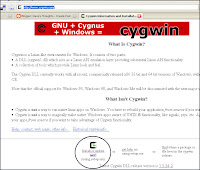
1. Download the Cygwin installer from their web site here: www.cygwin.com


I've circled the link in the picture above.

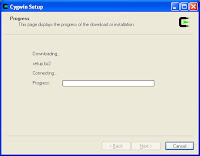
2. Run the setup.exe (see below) that you downloaded and press the next button.


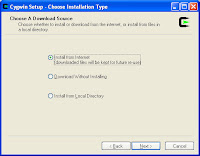
3. Select "Install from Internet" and press the next button


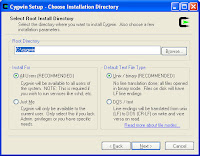
4. Pick an installation location, select how you want cygwin to be used and then press the next button.


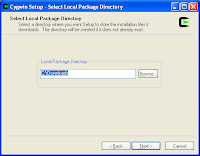
5. Pick a location where the setup.exe can downloaded files and press the next button.


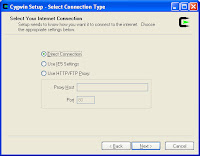
6. Tell the Setup.exe how it should connect to the Internet and then press the next button.


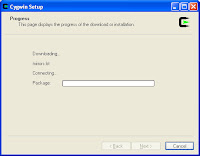
7. Setup.exe will retrieve a list of sites that have the files that need to be downloaded.


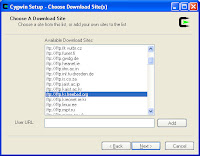
8. Pick a site to download the cygwin files from and press the next button:


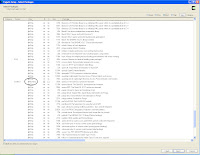
9. The setup.exe will download the list of packages that you can choice from:


10. Expand the Libs section of the tree, find the OpenSSL package, and left click the arrow in the new column till the text changes from "skip" to a version number:


I did NOT find this portion of the interface intuitive. I just thought that it wasn't available. I guess the only thing I'm use to changing in a tree view is a check box. Oh well, don't make this mistake.

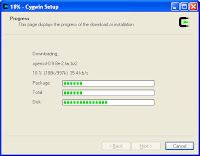
11. Download the files

12. Decide if you want to create a desktop icon or add a start menu icon and press the next button.

13. Delete the Setup.exe and the files that it created in the download directory you specified in step 5.

14. Your done.